Monday, March 4, 2013

Week 9 - Ray Traced 3d


 Ray Traced 3d

1. Make some text
2. Make it 3d
3. Top right corner click classic 3d button
4. In the dialogue box toggle to Ray traced 3d and apply
5. Geometry Options >
      Bevel Style
      Bevel Depth
      Extrusion Depth
6. Add a light to the compostion
7. Add an image behind the text, make it 3d
8. On the image hit selects light- no
9. Mess with the Material options of the Beveled Text


When you put a light on an object.
You can disable the light on the other objects behind it so it does not effect it.

Material Options
Accepts Light -  No

Before - After
With Transparency in the Material Options (not transform transparency)


How to do Reflection
1. (No transparency in the material options)
2. Set up the image like this :
 3.Turn up Reflection Intensity
4. Move the image around until you see it reflected in the text
5. * You can turn 'Appears in Reflections' to ONLY so that it doesn't get in the way of the camera

6. Environment layer -- it makes a sphere and your text is inside the sphere.
    Set Appears in Reflections to Only
    The image needs to be large or seemless or else it will be stretched and have  a seem

Friday, February 1, 2013

Week 4 - 3D Land

EXPORTING
When you export from AE
So your gradients don't look like poop. (using H264)

 In lossless
Instead of choosing Quicktime Movie from Compressor,
VIDEO CODEX > Photo - JPEG
 (the file size will be really big)
Then afterward Export from Quicktime > Export for web


Cinema 4D is better for extruding text.
It is still clunky in AE

New Composition
HDTV 1080
Set the Composition to
1920
1080

For Crappy
Lossless > Quicktime
      then format options > Video Codec h.264


Making an Awesome Cube
3D Space
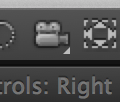
The active Camera is the one that is actually exported.
1 View is the normal

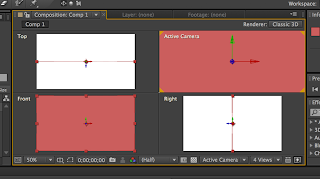
4 View > Looks like this
You could change with window has which Camera  by selecting it and toggling to whatever you want.
Pixel Aspect Ratio
In Comp setting the pixel aspect ratio has to be set to square

Make a new solid
Ctrl+Y
Layer Settings > Change the colors so each side of the cube has its own color.
Quickly rename you layers by selecting it and hit Enter - then change the name to be back, front, etc

Labels Color
(this is just to make things easier as you work)
Change the labels in Preferences>Label to color pick the layer color
Drag that color picker on top your solid in the time line to copy its color.


1. For the Z axis select the layer and hold SHIFT and Use the arrow keys. Holding Shift makes it go faster.
2. Line up all the side so it makes a cube
3. Unified Camera View - you are not actually moving the cube
unified camera
4. Drag a film onto a new comp. Stretch the film to fit the cube dimensions
 Drag that comp onto a side of the cube (one of the cube layers).


*****
Add the video to the Cube side
Select the layer you want to replace.
Hold the ALT key and drag the replacement object (movie) onto that layer.
The video will jump onto that piece

If you have audio on the movie files that you replaced a side with. All the audio will play.
So you have to turn off the individual channels of each.

*****


5. If you drag the cube into a new composition and hit 3D
it will still look 2d - not all the layers will be there
You have to hit the SUN icon (collapsing transformations and the 3d cube)
the cube and the sun need to be on


6. Camera
Layer > New Camera

Try adjusting Focus Distance if you cant see the cube in the Active Camera window
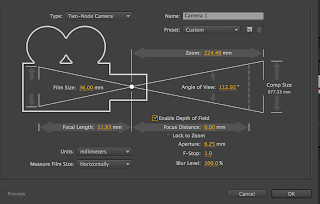
Check ENABLE DEPTH OF FIELD
7. Animating the Camera
Attach it to a Null object and animate that.

Right Click the Camera > AUTO ORIENT >- Orient on Path or Point of Interest.

You can put bezier handles on the path of the camera.
 Right Click > Keyframe interpolation

Monday, January 28, 2013

Week 2 - Video Notes

Expressions

Create an Expression - Pick Whip (spiral icon)
1. Option+Click on the Stop watch (on mac)
   (this reveals the transform value for that keyframe for example the Rotation or the Scale)
2. Click and Drag the Spiral icon to the thing you want to copy. For  example you can drag the spiral to the rotation of a different object.
3. Click in the timeline to accept the nex value (or click the extended keyboard enter)
4. The layer will copy the value of the other layer.

To temporarily disable the expression
1. Click the = iconand it turns to a

To disable the expression
1. Select the text in the expression box and delete it
 or
1. Hold Option key when you hit the = icon

Modify the Expression 
Change the text in the expression box

Multiply its Value
*4
*-2
At the end of the expression enter *2 
You can enter negative values to go opposite directions

Add values
+30

Expression Language Menu
The triangle button next to swirl give you a bunch of choices of preset values
Select one and mess with the numeric values in the parenthesis


Key Board Shortcuts

Expose the Keyframes
U

Expose only the Expressions of a layer
ee


Convert Audio to Keyframes1. Insert Audio track
2. On that layer right click.
3. Keyframe Assistant
4. Convert Audio to Keyframes
 AE generates a brand new layer called a Null object
 Its just a dummy layer
 Select the Audio Amplitude layer
 Hit U
 Inside you will see right channel, left channel, both channel

To work with only with the both channel 
Option+Shift and click on the Right Channel, then left channel
This removes them from the view in the timeline (it doesn't delete the keyframes)


Connect a layer to the audio file
Once the audio is converted to key frames
1. use the pick whip and drag  it to the slider property
2. click the blank area to accept the expression

As soon as there is any volume in the audio track the property is shown.
Modify the expression
On the audio key frames (slider) Select smoother from the window menu.
Adjust the tolerance of the smoother.

Monday, January 7, 2013

Week 1 - class notes

Partnership with PBS

Shape Layer: 
Creating a custom shape using the pen tool
You can have multiple shapes inside the shape layer

Shortcuts:
P for position
U to reveal all the key frames

Adjustment Layers
Layers > New Adjustment Layers
Effects everything below