Friday, February 8, 2013
Friday, February 1, 2013
Week 4 - 3D Land
EXPORTING
When you export from AE
So your gradients don't look like poop. (using H264)
In lossless
Instead of choosing Quicktime Movie from Compressor,
VIDEO CODEX > Photo - JPEG
(the file size will be really big)
Then afterward Export from Quicktime > Export for web
Cinema 4D is better for extruding text.
It is still clunky in AE
New Composition
HDTV 1080
Set the Composition to
1920
1080
For Crappy
Lossless > Quicktime
then format options > Video Codec h.264
Making an Awesome Cube
3D Space
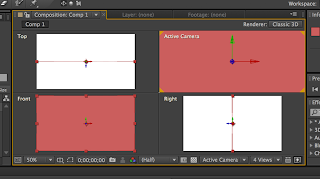
The active Camera is the one that is actually exported.
1 View is the normal
Pixel Aspect Ratio
In Comp setting the pixel aspect ratio has to be set to square
Make a new solid
Ctrl+Y
Layer Settings > Change the colors so each side of the cube has its own color.
Quickly rename you layers by selecting it and hit Enter - then change the name to be back, front, etc
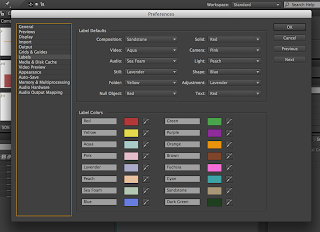
Labels Color
(this is just to make things easier as you work)
Change the labels in Preferences>Label to color pick the layer color
1. For the Z axis select the layer and hold SHIFT and Use the arrow keys. Holding Shift makes it go faster.
2. Line up all the side so it makes a cube
3. Unified Camera View - you are not actually moving the cube
4. Drag a film onto a new comp. Stretch the film to fit the cube dimensions
Drag that comp onto a side of the cube (one of the cube layers).
*****
Add the video to the Cube side
Select the layer you want to replace.
Hold the ALT key and drag the replacement object (movie) onto that layer.
The video will jump onto that piece
If you have audio on the movie files that you replaced a side with. All the audio will play.
So you have to turn off the individual channels of each.
*****
5. If you drag the cube into a new composition and hit 3D
it will still look 2d - not all the layers will be there
You have to hit the SUN icon (collapsing transformations and the 3d cube)
6. Camera
Layer > New Camera
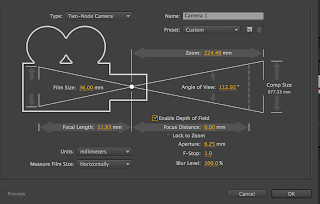
Try adjusting Focus Distance if you cant see the cube in the Active Camera window
7. Animating the Camera
Attach it to a Null object and animate that.
Right Click the Camera > AUTO ORIENT >- Orient on Path or Point of Interest.
You can put bezier handles on the path of the camera.
Right Click > Keyframe interpolation
When you export from AE
So your gradients don't look like poop. (using H264)
In lossless
Instead of choosing Quicktime Movie from Compressor,
VIDEO CODEX > Photo - JPEG
(the file size will be really big)
Then afterward Export from Quicktime > Export for web
Cinema 4D is better for extruding text.
It is still clunky in AE
New Composition
HDTV 1080
Set the Composition to
1920
1080
For Crappy
Lossless > Quicktime
then format options > Video Codec h.264
Making an Awesome Cube
3D Space
The active Camera is the one that is actually exported.
1 View is the normal
 |
| 4 View > Looks like this You could change with window has which Camera by selecting it and toggling to whatever you want. |
In Comp setting the pixel aspect ratio has to be set to square
Make a new solid
Ctrl+Y
Layer Settings > Change the colors so each side of the cube has its own color.
Quickly rename you layers by selecting it and hit Enter - then change the name to be back, front, etc
Labels Color
(this is just to make things easier as you work)
Change the labels in Preferences>Label to color pick the layer color
 |
| Drag that color picker on top your solid in the time line to copy its color. |
1. For the Z axis select the layer and hold SHIFT and Use the arrow keys. Holding Shift makes it go faster.
2. Line up all the side so it makes a cube
3. Unified Camera View - you are not actually moving the cube
 |
| unified camera |
Drag that comp onto a side of the cube (one of the cube layers).
*****
Add the video to the Cube side
Select the layer you want to replace.
Hold the ALT key and drag the replacement object (movie) onto that layer.
The video will jump onto that piece
If you have audio on the movie files that you replaced a side with. All the audio will play.
So you have to turn off the individual channels of each.
*****
5. If you drag the cube into a new composition and hit 3D
it will still look 2d - not all the layers will be there
You have to hit the SUN icon (collapsing transformations and the 3d cube)
 | ||
| the cube and the sun need to be on |
6. Camera
Layer > New Camera
Try adjusting Focus Distance if you cant see the cube in the Active Camera window
 |
| Check ENABLE DEPTH OF FIELD |
Attach it to a Null object and animate that.
Right Click the Camera > AUTO ORIENT >- Orient on Path or Point of Interest.
You can put bezier handles on the path of the camera.
Right Click > Keyframe interpolation
Subscribe to:
Comments (Atom)

